This sample will serve as an introduction to Microsoft Bots and Dialogs, and also to show you that we can use python's capabilities from within C#.

Prerequisites
The first step is to get all the prerequisites to create a Bot project based on the Microsoft Bot Framework on Visual Studio.
You can also see those steps here:
https://docs.microsoft.com/en-us/bot-framework/dotnet/bot-builder-dotnet-quickstart
- Install Visual Studio 2017 for Windows (If you don't have it you can install the VS 2017 community version for free).
- Download the Bot Application template from here:
http://aka.ms/bf-bc-vstemplate
and install the template by saving the .zip file to your Visual Studio 2017 project templates directory.The Visual Studio 2017 project templates directory is typically located here:
%USERPROFILE%\Documents\Visual Studio 2017\Templates\ProjectTemplates\Visual C#\
Create the BOT:
Now we will create our Bot project.
Open Visual Studio and create a new C# project. Choose the Bot Application template for your new project. And name it 'SolveBot'.

Now we need to add the Microsoft.Bot Nuget package for our code to compile:
1. Right-click on the project name and select Manage NuGet Packages.
2. In the Browse tab, type "Microsoft.Bot.Builder".
3. Locate the Microsoft.Bot.Builder package in the list of search results, and install or update it.

Thanks to the Bot Application template, your project contains all of the code that's necessary to create the bot. We have it up and running although it does not do what we want it to, at this point.
One more thing, to be able to test our Bot we will need the Bot Framework Emulator, please download it from here:
https://emulator.botframework.com/
It will allow you to interact with your project and test its output.
Modify the default Bot:
If you take a look at the code of our app, you will notice that it works like a Web API with one controller 'Messages Controller', the work of this controller is (among other things) to initiate the contact by receiving an initial message and the passing the control to our RootDialog, that RootDialog class is the starting point of our conversation with the user. So we will leave this controller exactly as it is:

The conversation or Dialog is handled by one or more dialog classes that interact with the user and expect one or more answers, depending on our code the conversation can go to different places, its all about creating our Dialog logic.
In this case we will only use two dialog classes:
The RootDialog - Will salute the user, send him to our dialog that asks for an expression to solve, and once that dialog is done,use our solver service and will show the user the results.
The ReadExpressionDialog - This one will ask the user for an expression to solve and will finish by returning the result to the caller Dialog, in this case Root, or an error if the user failed to provide an expression to solve.
RootDialog:
We will start to make our changes in the RootDialog Class, first lets add this two private variables, we will use them to save the expression read from the user, and the second one to avoid saluting the user more that one time, so add this to our Root Dialog:

We will leave the StartAsync function alone, but we need to change the MessageReceivedAsync one, because by default all it does is read the user input and return the number of characters that input has.
What we want it to do is to ignore that first input and call our SendWellcome Message to show the user a welcoming message so replace it with this code:

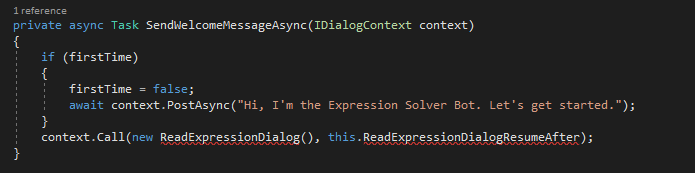
Now lets add our SendWelcomeMessageAsync function, On this function what we want to achieve is to greet the user if this is the first time in this Dialog, then we will pass the control to our 'ReadExpressionDialog' class, and Once that dialog finishes we want it to execute the 'ReadExpresssionDialogResumeAfter' function on which we will handle the results of that dialog, so add this function below:
Now before going to the ReadExpressionDialog, we will add the Resume function to handle the results, don't worry about the squiggly red lines, they will go away when we finish adding the other Dialog. So lets add the 'ReadExpresssionDialogResumeAfter' function, In this one we will:
- Receive the result from our ReadExpressionDialog, and store it on the expression variable.
- We will call our Solver Class to process the expression (we will create that class in a moment) and show the result to the user
- If there was an error reading the expression we will catch that error and inform the user, so the process can start again.
- Then we will pass the control to our Welcoming function So the process can start again, this time bypassing the welcoming message since we already did that.
So this is the function:

Now lets add our new Dialog Class.
- Right Click on the Dialogs Folder > Add > Class

That class has to implement the Interface ' IDialog<string>' since we will return a string as a result of that conversation.
Include the following references:

Next we need to add our StartAsync function, this is the starting point of this dialog, in our case we will display a question, and wait for an answer then pass control to the function that will handle that answer. Also our Dialog classes need to be Serializable, So, add this:

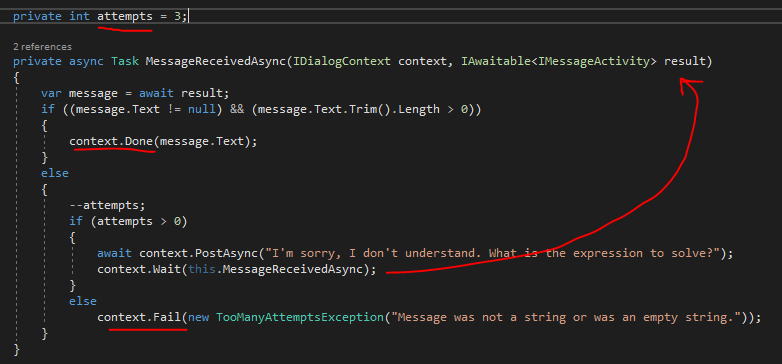
Now lets add the final function on this dialog the 'MessageReceivedAsync' this function will read the user's input and validate is not empty, It will give 3 opportunities before throwing an exception. If the user's input is correct then it will return it to his calling Dialog (RootDialog) by using
'context.Done('result of this dialog')'
With That we have our Dialog Logic finished. the only missing piece is the Solver class to process that expression.
The Solver with Python:
Since we don't have an standard library to solve expressions on C# we will reach a hand to Python, which it does, to help us solve this problem.
So First lets add the 'IronPython' Nuget Package to our project, So right click on the project and select 'Manage Nuget Packages', then search for it and install it.

Now create a class named Solver in our Dialogs Folder:
This class will reference the Python libraries and will have only one function 'Execute', this method will:
- Receive an expression as a string
- instantiate a Python engine
- Use the engine's 'Execute' to evaluate the expression
- And return the result or a 'non solvable' message
Pretty simple, I will let it to you to explore more functions of the Python engine, but as you can see the interaction is pretty smooth, thanks to IronPython.
This is the complete solver class:

Test it:
Now lets run the solution, you will get this window on you explorer if the Application is running correctly:

If you downloaded and installed the Bot Emulator Open It and enter the app url adding the api/messages route on the endpoint url text box:
'http://localhost:3979/api/messages'
And click Connect.

Wait a couple of second and start by saying Hi.
The Bot should show you the welcome greeting and then ask for an expression enter a valid on like " (8+3)*4" and you should get an answer.

There you have it you own SolverBot in C# and powered by Python. Now imagine what you can do from here ;).
And that, My friend, it's all!
No comments:
Post a Comment