Pages

Friday, September 1, 2017

Construye tu propio buscador en C# usando Azure Search

Azure Search es un servicio en la nube de Azure para poder hacer búsquedas indexadas sobre cualquier tipo de datos que creemos,tiene habilidades de filtrado basado en el sintaxis de  Lucene  y tiene muchas características  que esperarías de Solr o ElasticSearch.

Te mostrare como configurar tu servicio, como introducir datos y realizar búsquedas sobre esos datos. Nos saltaremos la construcción de un UI, eso lo puedes hacer usando tu tecnología favorita. Pero te mostrare el código en C# para comunicarse son el servicio de  Azure Search.


Parte 1 - Configurar tu Azure Search
Para esto necesitas una cuenta de Azure, Puedes aplicar por una cuenta gratuita para realizar tus pruebas por un periodo de tiempo. Una vez que tengas tu cuenta creada entra al portal de azure:


Una vez ahí haz click en el símbolo '+' para adicionar un nuevo servicio 
- Luego en la caja de búsqueda teclea: 'azure Search' y presiona Enter. 
- Luego haz click en 'Create'  en la parte inferior del Tab.


A continuación pongamos un nombre a nuestro servicio, el servicio puede tener mas de un indice (o tipo de datos) así que le pondremos un nombre general. Selecciona tu tipo de suscripción y haz click en  'Create'


Ahora tienes que esperar unos momentos hasta que el servicio sea deployado. Una vez creado podrás ver el servicio listado en tu dashboard. Entra al servicio haciendo click en su nombre.


Monday, August 28, 2017

Haz tu propio C# snippet para generar Unit Tests

El objetivo de los 'snippets' es evitarnos el tener que teclear lo mismo cada vez, y si tu estas actualmente haciendo Unit tests, no estas ya cansado de escribir  arrange, act y assert ?

Si eres como yo, entonce la respuesta es SI. y no solo eso sino que hay otras areas en las que podemos mejorar nuestra experiencia de programacion. Asi que toma esto como un ejemplo introductorio a los snippets, y creemos uno para nuestro unit test.

Lo que queremos lograr es que con un par de teclas podamos obtener esto:


Y que el cursor se enfoque en la parte WhatAreWeTesting (que estamos testeando)  de el nombre de la funcion para que podamos cambiarla, luego con un TAB para a la parte 'ExpectedResult' (Resultado esperado) y luego despues de un ENTER final que el cursor vaya a la linea de arrange para poder empezar a escribir nuestro codigo.

Un snippet es solo un archivo XML que tiene una estructura especifica, lo puedes crear en cualquier editor de texto, en este caso yo usare el Visual Studio Code .

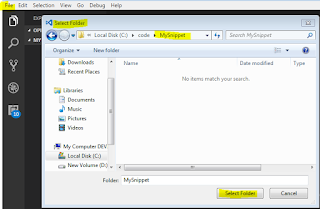
Asi que abrimos cualquier Folder en VS Code:


y añadimos un nuevo archivo XML:


Monday, July 31, 2017

Build your own C# search Engine using Azure Search

Azure Search is a Cloud service provided by Azure to enable an indexed search over any type of data you can create, It has filters abilities based on Lucene syntax and its has many of the features you would expect from Solr or ElasticSearch.

I will show you how to configure your service, and hot to get data in and perform searches over that data. We will skip the UI part, which you can build with your favorite tool. But I will show you the C# code to talk to the Azure Search Service.


Part 1 - Setup your Azure Search
For this you need an Azure Account, You can apply for a free one if you have a credit card to register. Once you have the Azure Account enter the azure portal:


Once there click the '+' sign to add a new service 
- Then on the search box  type: 'azure Search' and 'Enter'. 
- Then clic the 'Create' button on the lower part of the azure search tab.


Next lets put a name to our service this service can have more than one Index (or type of data) so lets make a general name for it. Select your subscription and click on 'Create'


Now you have to wait until the service its created. Once the service is created you will see it listed on your dashboard. enter the service by clicking on its name.

Friday, July 7, 2017

Make your own C# snippet to stub out Unit Tests

The point of snippets is to avoid repetitive typing and if you are currently creating unit tests, aren't you tired of writing arrange,act and assert ?

If you are like me, then the answer is Yes. And not only that but there are other areas that we can use to improve our coding experience. So take this as an introductory example to snippets, and lets create our unit test one.

What we wan to achieve is that after a couple of keystrokes we get this:


And the focus on the WhatAreAreTesting part of the function name so we can change it then one TAB press for ExpectedResult and then a final ENTER to get us to the arrange line so we can start coding.

A code snippet is just an XML file with an especific structure, you can create it in any text editor you want, in this case I will use Visual Sutio Code .

So lets open any Folder on VS Code:


then Add a new XML File:


Wednesday, June 21, 2017

Calling Azure functions from C# with security enabled

Azure functions allow us to run server-less code. We will see how, and in the interest of this sample we will simulate the problem of having to run some code when a payment is done, the code to do it will be on azure and the call would come from our C# payment app.
So to ensure we don't get unauthorized calls, we will activate security on our Azure function and I will show you how to make a secure call and review the azure logs for those calls. So lets begin.

Part 1 - Azure function

In order to create our azure function lets head to:
portal.azure.com
and enter your credentials, if you dont have an azure account, you can get a trial account for free.

Once inside the portal click on the new button '+' then on 'Compute' and on the FuctionApp option.


Then we will set the name of our new function as  ‘licensefunctions’ and click on ‘Create’ (If the name is not available just choose one you see fit)


Tuesday, June 20, 2017

Usar Azure functions en C# con seguridad Activada

Azure functions nos permiten correr codigo 'sin-servidor'. Veremos como, y para este ejemplo simularemos el problema de tener que correr codigo cuando un pago es hecho por un cliente, el cdigo para hacerlo esta en Azure y la llamada vendria de nuestra aplicacion de pago.
Asi que para asegurarnos de no recibir llamadas fraudulentas , vamos a activar la seguridad de nuestra Azure function y te mostrare como hacer una llamada segura y revisar el log de Azure de esas llamadas. Asi que, comencemos.

Parte 1 - Azure function

Para crear nuestra funcion azure dirigete a:
portal.azure.com
e ingresa tus credenciales, si no tienes una cuenta azure, puedes obtener una cuenta de prueba gratis.

Una vez dentro del porta; haz click en el botón '+' y luego en 'Compute' y en la opción FuctionApp.


Ahora pondremos el nombre de nuestra nueva función  ‘licensefunctions’ y hacemos click en ‘Create’ (Si el nombre no esta disponible, escoge uno que veas conveniente)


Wednesday, June 7, 2017

Creating .NET Projects using the CLI

The .Net CLI or Command Line Interface. Are a set of cross platform commands packed as a tool that come as part of the .NET Core installation.

This accomplishes that We have the same set of tools on different OS (Windows, Linux, iOS) and also to allow us to have a an easier time programming on the .Net platform when we don't have Visual Studio available.
So we can code using a lightweight IDE like Visual Studio Code, and perform otherwise complicated tasks with these tools instead of having to change everything by hand.

These sets of commands allow us to create a basic App from a number of templates, get dependencies installed, add or remove dependencies, compile and Run our Apps, etc.. 

For this post we will use Visual Studio Code so I can easily show you the files created.
In case you are unfamiliar of the use of Visual Studio Code you need to create a folder in which you will work and then open that folder in Visual Studio Code like this:
- Open VS Code
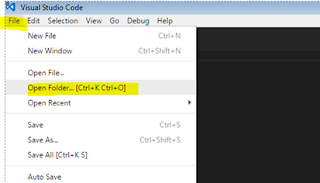
- Goto File > Open Folder


Then select your folder and click on 'Open Folder'


Then open the console terminal press 'ctrl + `'
And you will get the console in the lower part of your window of your VS Code:


Tuesday, June 6, 2017

Creacion de Proyectos .NET usando el .NET CLI

El .Net CLI o Interfaz de Linea de comandos. Son un grupo de comandos multiplataforma empaquetados como una herramienta que vien como parte de la instalacion de .NET Core.

Esto logra que tengamos el mismo conjunto de herramientas en distintos OS (Windows, Linux, IOS) y tambien nos permite programar mas facilmente an la plataforma .Net cuando no tenemos Visual Studio disponible.
Osea que podemos codificar usando cualquier IDE liviano, como Visual Studio Code, y lograr tareas que llegan a ser complicadas cuando se hacen a mano, de manera automatica.

Este conjunto de comandos nos permiten crear la base para nuestras aplicaciones basados en plantillas disponibles, bajar las dependencias del proyecto, adicionar o quitar dependencias, compilar y correr nuestras aplicaciones, etc.. 

En este Post vamos a usar Visual Studio Code para poder mostrarles facilmente los archivos creados por el CLI.
En caso de que no estes familiarizado con Visual Studio Code, necesitas crear un folder de trabajo que es donde armaras tu aplicacion, y ese folder tienes que abrirlo desde VS Code como el folder principal, esto se hace asi:
- Abre  VS Code
- Ve a File > Open Folder


Luego, seleccionas tu folder y haz click en 'Open Folder'


Una vez abierto el folder, para mostrar la terminal de consola presiona 'ctrl + `'
Y esta se abrira en la parte inferior de la ventana de trabajo en VS Code:


Thursday, June 1, 2017

Expression Solver Bot on C# using Python engine (Bots 101)

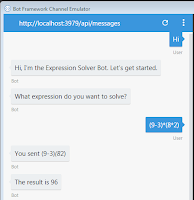
This sample will serve as an introduction to Microsoft Bots and Dialogs, and also to show you that we can use python's capabilities from within C#.


Prerequisites

The first step is to get all the prerequisites to create a Bot project based on the Microsoft Bot Framework on Visual Studio.
You can also see those steps here:

https://docs.microsoft.com/en-us/bot-framework/dotnet/bot-builder-dotnet-quickstart

- Install Visual Studio 2017 for Windows (If you don't have it you can install the VS 2017 community version for free).

- Download the Bot Application template from here: 

http://aka.ms/bf-bc-vstemplate 

and install the template by saving the .zip file to your Visual Studio 2017 project templates directory.The Visual Studio 2017 project templates directory is typically located here:

%USERPROFILE%\Documents\Visual Studio 2017\Templates\ProjectTemplates\Visual C#\


BOT para resolver expresiones en C# usando el engine de Python (Bots 101)

Este ejemplo sirve como una introduccion a el uso de Microsoft Bots y su manejo de dialogos, y tambien para mostrar que podemos usar funcionalidades de Python desde C#.


Pre-requisitos

El primer paso es obtener todos los prerequisitos para crear un proyecto de tipo BOT usando el Microsoft Bot Framework en Visual Studio.
Estos pasos tambien se pueden ver en este link:

https://docs.microsoft.com/en-us/bot-framework/dotnet/bot-builder-dotnet-quickstart

- Instala Visual Studio 2017 para Windows (Si no lo tienes puedes bajar e instalar la version community de VS 2017 gratis).

- Baja la plantilla de una aplicacion tipo Bot (Bot Application template) de aqui: 

http://aka.ms/bf-bc-vstemplate 

e instala la plantilla grabando el archivo .zip en el directorio de plantillas de  proyectos de Visual Studio 2017.Este folder esta generalmente ubicado aqui:

%USERPROFILE%\Documents\Visual Studio 2017\Templates\ProjectTemplates\Visual C#\

Monday, May 22, 2017

Translating on a ASP.Net Core C# Web API App using Google service

We are going to implement a translation web API on Asp.net Core using not the Google API libraries (which would cost you) but the publicly available google translation service.So basically we will interact with that Service as if we were another http client. 

Lets start by creating a new ASP NET Core Web App, we will call it 'babel':


Select that you want it to be of type Web API

After the creation is finished we will get an App with one sample controller, So lets add our own one:

Sunday, May 21, 2017

Traducir en una Web API de ASP.Net Core con C# usando Servicios de Google

Vamos a implementar una Web API para traducir un texto en ASP.Net Core usando: No las librerias de Google API (que  tienen un costo) sino que el servicio publico de traduccion de Google. Asi que, basicamente vamos a interactuar con ese servicio como si fueramos un cliente http.

Comenzaremos creando una nueva applicacion ASP.NET Core, la llamaremos  'babel':


Luego seleccionamos que sea de tipo Web API


Cuando termine la creacion de nuestro proyecto tendremos una applicacion con un controllador de ejemplo, asi que adicionaremos el nuestro:


Tuesday, May 9, 2017

Dynamic C# to use Excel without the InterOp Assemblies

We will see how we can export to excel  using the COM Interop but without the Interop assemblies. Might seem impossible, but C# will do it.

First, lets create a console Application:


Now we will add code to export data to an Excel sheet, but notice that we will not add any extra reference or 'using' to any Interop Library, But we will write code as if we had done that.


As we try to use Excel specific calls we get a compile error, clearly we see the squiggly red line.  This is because we just declared the Excel Type as an Object, which it is, but we can't say an 'excel application object' because we don't have the Interop assemblies linked. 

Here is were we will make use of the   ...   drum roll ... Dynamic C# type.

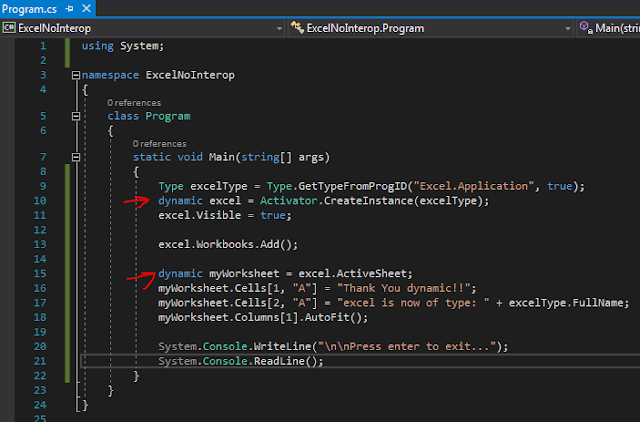
This will allow us to compile just fine, The dynamic type will accept any type we get at run time, We just need to be careful not to make calls that would fail at run time, like a method that does not exists in the excel object we will get. 
Think of Dynamic (at least on this example ) as telling the compiler "Be cool, I have things under control, you will see it at run time". The only cost its not having the 'Intellisense' to help us when editing the code since Visual studio does not know the specific type we will get.

Now with the dynamic type we can compile just fine, no red lines. Just remember, that Excel should be registered on our machine for it to work.


In this case our excel dynamic object would be of type 'Excel.Application' but that only happens at run time. We run the program to verify.


And there you have it, Dynamic C# type just helped us simplify our code.

And that, my friend, It's all!

Monday, May 8, 2017

Dynamic C# para usar Excel sin los Assemblies de InterOp

Vamos a ver como podemos exportar a un archivo Excel desde C# usanto el Interop COM pero sin los assemblies de Interop de Excel. Puede que parezca imposible, pero C# lo hara por ;).

Para este ejemplo, primero creamos una aplicacion tipo Consola:


Ahora vamos a adicionar codigo para exportar datos a una hoja de Excel, pero tomen nota que no adicionamos ninguna referencia extra a algun dll Interop de office, ni adicionamos ningun using especial, Pero vamos a escribir el codigo como si lo hubieramos hecho.


Cuando tratamos de usar funciones especificas que sabemos estan en las librerias del Interop de excel, como el "Visible = true" vemos un error de compilacion, claramente vemos el subrayado rojo.  Esto es porque hemos declarado nuestro excel como un tipo Objeto, lo cual si es, pero no podemos indicar un 'objeto tipo excel' por que no tenemos referencia a las librerias Interop. 

Wednesday, March 22, 2017

ASP.NET Core and Angular 2 the Easy way

Prerequisites:
The tools we need installed on our machine before starting this tutorial are:

Node: https://nodejs.org/en/  (c'mon you already have this right ?)

ASP.net Core SDK (https://www.microsoft.com/net/download/core)
   OR 
Visual Studio 2017 (https://www.visualstudio.com/es/vs/whatsnew/) that will install also the ASP.NET Core tools. You can get the community version for free.

We can do all of this tutorial from the command prompt, but I rather show it to you using 'Visual Studio Code' so you will need Visual Studio Code if you want to do it this way.

Open Visual Studio Code:

Open an application folder:

To create a new folder we click on 'New Folder' put a name and select it.

Tuesday, March 21, 2017

ASP Net Core y Angular 2 Facilmente

Pre requisitos:
Las herramientas que necesitamos tener instaladas en nuestra maquina antes de empezar el tutorial son:

Node: https://nodejs.org/en/  

ASP.net Core SDK (https://www.microsoft.com/net/download/core)
   OR 
Visual Studio 2017 (https://www.visualstudio.com/es/vs/whatsnew/) Esto instalara tambien las herramientas de ASP.NET Core. La version Community es de uso gratuito.

Podemos realizar todo el tutorial desde el simbolo de sistema, Pero prefiero mostrarles usando el 'Visual Studio Code' ya que me parece una herramienta excelente, gratuita y liviana, Asi que necesitaran bajarse el  'Visual Studio Code' si quieren hacerlo de esta manera.

Tuesday, March 7, 2017

Get Rid of 'Magic Strings'

'magic string is an input that a programmer believes will never come externally and which activates otherwise hidden functionality.'


Basically is the term use to identify hard-coded strings inside our code. This strings are sometimes necessary in a program or at least can not be avoided in some situations (like dealing with legacy code).
The main problem with magic strings is that they are error prone, especially if used in more than one place, because we could mistype the magic strings and we will not get any compilation error or warning.

For example:


There are a couple of ways to deal with this.

Estas usando las propiedades de clases correctamente ?

Ultimamente estoy viendo mucho codigo escrito asi:


Tienes tus miembros privados, y creaste las propiedades publicas para ellos, Y estas feliz y sigues con tu vida. Pero te pregunto, hay algun problema en lo que vemos aqui ? Tomate un momento para pensarlo.

Veras, uno de los propositos de las propiedades es el de proteger los miembros privados. Pero si no hay anda de codigo en el getter o el setter de la propiedad, entonces no estamos protegiendo nada realmente, simplemente estamos pasando los valores al miembro privado tal como llegan.

Este es un error comun, creamos la clase e inmediatamente, casi inconsientemente, creamos las propiedades para nuestros miembros privados. Porque nos enseñaron asi o porque programamos como robots. No va a causar ninguna excepcion y ciertamente puedes usarlas sin problemas si tienes validaciones en alguna otra parte, Pero no estas aprovechando las ventajas de uno de los objetivos de las propiedades.

Monday, March 6, 2017

Deshacerse de las 'Magic Strings' en C#

'Una magic string es un input que el programador cree que nunca vendra de una fuente externa y que activa funcionalidad que de otra manera estaria oculta.'


Basicamente el termino se usa para identificar a las cadenas existentes directamente en nuestro codigo (hard-codeadas). Testas cadenas sona  veces necesarias en una aplicacion o al menos a veces no pueden ser evitadas en algunas situaciones  (como cuando tenemos que lidiar con codigo antiguo).
El principal problema con las Cadenas Magicas es que son propensas al error, especialmente si son usadas en ams de un lugar de la aplicacion, porque podriamos aquivocarnos al teclarla y no tendriamos ningun error de compilacion o advertencia.

Por ejemplo:


Hay un par de maneras de resolver esto.

Thursday, February 9, 2017

Are you using class properties correctly ?

I am getting used to see properties implemented this way:


So you have your private members, and you created the properties for those, so you are happy and go on with your life. But I ask, Is there anything wrong in what we see here? Take a minute to think about it.


You see, the purpose of the properties is to protect the private members. But if there is absolutely no code in the properties getter or setter, then we are not really protecting anything, we just pass the values to the private member as they come.

This is a common mistake,  we create a class and immediately, almost unconsciously, we create the properties for our private fields. Because we were taught this way. It will not cause any exception and certainly you can use it  without problems is you have validations elsewhere, But then you are not taking advantage of one of the purpose of properties.

Now suppose our age variable has to have valid range, Or that for reporting purposes you have to see a 'Not Available' when a person does not have an address registered. You could do this:


See, now we are really using the properties for something meaningful. This is just a small example. What do you think about that ? It certainly got ME thinking.

And that, my friend, It's all!