The .Net CLI or Command Line Interface. Are a set of cross platform commands packed as a tool that come as part of the .NET Core installation.
This accomplishes that We have the same set of tools on different OS (Windows, Linux, iOS) and also to allow us to have a an easier time programming on the .Net platform when we don't have Visual Studio available.
So we can code using a lightweight IDE like Visual Studio Code, and perform otherwise complicated tasks with these tools instead of having to change everything by hand.
These sets of commands allow us to create a basic App from a number of templates, get dependencies installed, add or remove dependencies, compile and Run our Apps, etc..
For this post we will use Visual Studio Code so I can easily show you the files created.
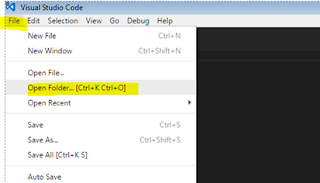
In case you are unfamiliar of the use of Visual Studio Code you need to create a folder in which you will work and then open that folder in Visual Studio Code like this:
- Open VS Code
- Goto File > Open Folder
Then select your folder and click on 'Open Folder'
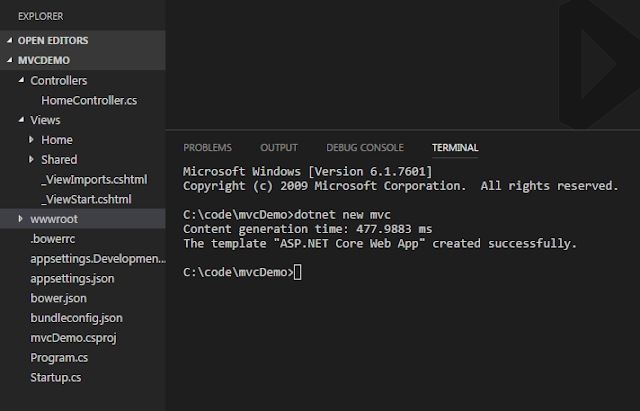
Then open the console terminal press 'ctrl + `'
And you will get the console in the lower part of your window of your VS Code:
We will test 3 types of applications and then at the end we will see a list of some of the commands available in the .NET CLI.
Before each command we have to add the 'dotnet ', that is the executable name of the tool.
The first command you should know is the 'new' command. By calling:
dotnet new
We can see all the templates available for the 'new' command:
Templates Short Name Language Tags
----------------------------------------------------------------------
Console Application console [C#], F# Common/Console
Class library classlib [C#], F# Common/Library
Unit Test Project mstest [C#], F# Test/MSTest
xUnit Test Project xunit [C#], F# Test/xUnit
ASP.NET Core Empty web [C#] Web/Empty
ASP.NET Core Web App mvc [C#], F# Web/MVC
ASP.NET Core Web API webapi [C#] Web/WebAPI
Solution File sln Solution
To add more templates, for example templates for SPA (Single Page Apps) applications we can use:
dotnet new --install Microsoft.AspNetCore.SpaTemplates::*
And our list of templates will now include:
Templates Short Name Language Tags
------------------------------------------------------------------------------
MVC ASP.NET Core with Angular angular [C#] Web/MVC/SPA
MVC ASP.NET Core with Aurelia aurelia [C#] Web/MVC/SPA
MVC ASP.NET Core with Knockout.js knockout [C#] Web/MVC/SPA
MVC ASP.NET Core with React.js react [C#] Web/MVC/SPA
MVC ASP.NET Core with React.js and Redux reactredux [C#] Web/MVC/SPA
MVC ASP.NET Core with Vue.js vue [C#] Web/MVC/SPA
These templates are used by calling its 'Short Name' after the 'dotnet new', Some of these templates have specific additional options, for example to indicate that we want to use the netcore instead of the full net framework we could add:
> dotnet new mvc --auth None --framework netcoreapp1.1
Now lets create some sample applications:
Console App
Open a Folder on VS Code, then open the console terminal by pressing 'ctrl + `' then type:
>dotnet new console
This will create your project file and a main file called 'Class1.cs'
Now, to download the dependencies of your App, use:
>dotnet restore
So now we have a sample hello worl console app ready to be modified.
Lets run the app:
>dotnet run
DLL C# Library
Open a Folder on VS Code, then open the console terminal by pressing 'ctrl + `' then type:
>dotnet new classlib
This will create your project file and a file program.cs that will be empty at this moment:
Following we will download our dependencies using:
>dotnet restore
So now we have an empty shell of what our library would be and all dependencies downloaded.
Lets compile the app:
>dotnet build
We now have our dll file created.
Asp.Net MVC Application:
Open a Folder on VS Code, then open the console terminal by pressing 'ctrl + `' then type:
>dotnet new mvc
This command will create an MVC App based on the template, that includes a sample controller for you to start working with.
Following we must download the dependencies, use:
>dotnet restore
Now, lets run our app:
>dotnet run
To see our basic app working, enter the specified URL on your explorer:
So there you go, that is just a sample on the use of the .Net CLI. you can setup your work for new projects and build from there all from the command line and your favorite IDE.
There are a lot of more commands for example to add or remove Nuget packages, etc. So here is a small list:
List of commands
(Remember we prefix each one with 'dotnet ...'):
Basic commands
new -> Creates a new project, configuration file, or solution based on the specified template.
restore -> will read the dependencies from the project and download them.
build -> Will build your solution.
publish -> Packs the application and its dependencies into a folder for deployment to a hosting system.
run -> Will compile and run your App.
test -> .NET test driver used to execute unit tests.
vstest -> Runs tests from the specified files.
pack -> builds the project and creates NuGet packages. The result of this command is a NuGet package.
migrate -> Migrates a Preview 2 .NET Core project to a .NET Core SDK 1.0 project.
clean -> Cleans the output of a project.
sln -> Modifies a .NET Core solution file (you can add or remove projects).
Project modification commands
add package -> Adds a package reference to a project file (dotnet add [<PROJECT>] package <PACKAGE_NAME>)
add reference -> Adds project-to-project (P2P) references.
remove package -> Removes package reference from a project file (dotnet remove [<PROJECT>] package <PACKAGE_NAME>)
remove reference -> Removes project-to-project references.
list reference -> Lists project to project references. (dotnet list [<PROJECT>] reference)
For more information on the CLI commands please see:
And that, my friend, Its all!


No comments:
Post a Comment