Pages

Wednesday, June 21, 2017

Calling Azure functions from C# with security enabled

Azure functions allow us to run server-less code. We will see how, and in the interest of this sample we will simulate the problem of having to run some code when a payment is done, the code to do it will be on azure and the call would come from our C# payment app.
So to ensure we don't get unauthorized calls, we will activate security on our Azure function and I will show you how to make a secure call and review the azure logs for those calls. So lets begin.

Part 1 - Azure function

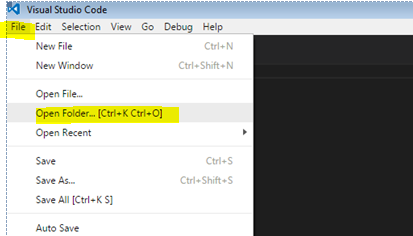
In order to create our azure function lets head to:
portal.azure.com
and enter your credentials, if you dont have an azure account, you can get a trial account for free.

Once inside the portal click on the new button '+' then on 'Compute' and on the FuctionApp option.


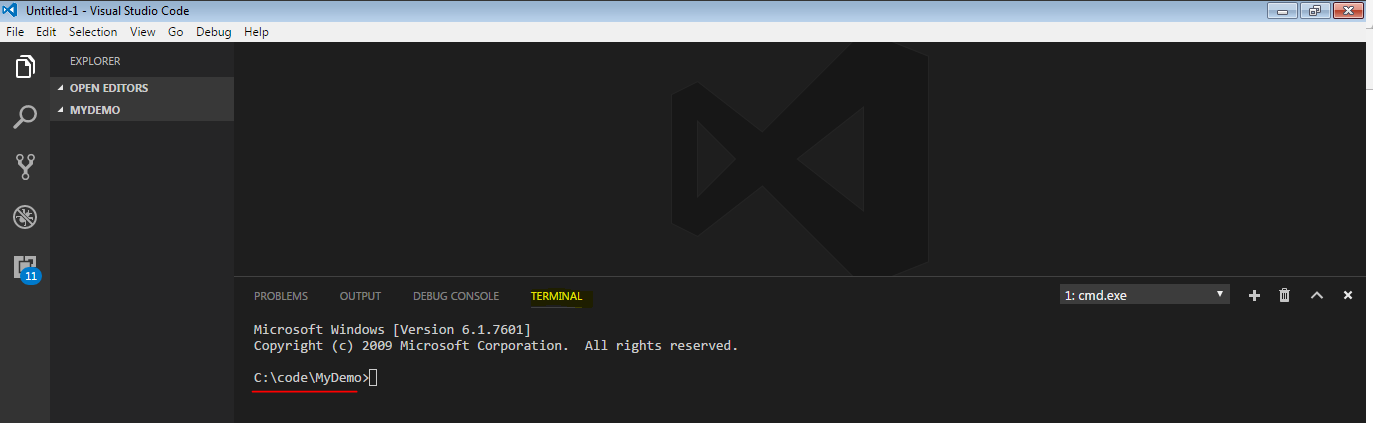
Then we will set the name of our new function as  ‘licensefunctions’ and click on ‘Create’ (If the name is not available just choose one you see fit)


Tuesday, June 20, 2017

Usar Azure functions en C# con seguridad Activada

Azure functions nos permiten correr codigo 'sin-servidor'. Veremos como, y para este ejemplo simularemos el problema de tener que correr codigo cuando un pago es hecho por un cliente, el cdigo para hacerlo esta en Azure y la llamada vendria de nuestra aplicacion de pago.
Asi que para asegurarnos de no recibir llamadas fraudulentas , vamos a activar la seguridad de nuestra Azure function y te mostrare como hacer una llamada segura y revisar el log de Azure de esas llamadas. Asi que, comencemos.

Parte 1 - Azure function

Para crear nuestra funcion azure dirigete a:
portal.azure.com
e ingresa tus credenciales, si no tienes una cuenta azure, puedes obtener una cuenta de prueba gratis.

Una vez dentro del porta; haz click en el botón '+' y luego en 'Compute' y en la opción FuctionApp.


Ahora pondremos el nombre de nuestra nueva función  ‘licensefunctions’ y hacemos click en ‘Create’ (Si el nombre no esta disponible, escoge uno que veas conveniente)


Wednesday, June 7, 2017

Creating .NET Projects using the CLI

The .Net CLI or Command Line Interface. Are a set of cross platform commands packed as a tool that come as part of the .NET Core installation.

This accomplishes that We have the same set of tools on different OS (Windows, Linux, iOS) and also to allow us to have a an easier time programming on the .Net platform when we don't have Visual Studio available.
So we can code using a lightweight IDE like Visual Studio Code, and perform otherwise complicated tasks with these tools instead of having to change everything by hand.

These sets of commands allow us to create a basic App from a number of templates, get dependencies installed, add or remove dependencies, compile and Run our Apps, etc.. 

For this post we will use Visual Studio Code so I can easily show you the files created.
In case you are unfamiliar of the use of Visual Studio Code you need to create a folder in which you will work and then open that folder in Visual Studio Code like this:
- Open VS Code
- Goto File > Open Folder


Then select your folder and click on 'Open Folder'


Then open the console terminal press 'ctrl + `'
And you will get the console in the lower part of your window of your VS Code:


Tuesday, June 6, 2017

Creacion de Proyectos .NET usando el .NET CLI

El .Net CLI o Interfaz de Linea de comandos. Son un grupo de comandos multiplataforma empaquetados como una herramienta que vien como parte de la instalacion de .NET Core.

Esto logra que tengamos el mismo conjunto de herramientas en distintos OS (Windows, Linux, IOS) y tambien nos permite programar mas facilmente an la plataforma .Net cuando no tenemos Visual Studio disponible.
Osea que podemos codificar usando cualquier IDE liviano, como Visual Studio Code, y lograr tareas que llegan a ser complicadas cuando se hacen a mano, de manera automatica.

Este conjunto de comandos nos permiten crear la base para nuestras aplicaciones basados en plantillas disponibles, bajar las dependencias del proyecto, adicionar o quitar dependencias, compilar y correr nuestras aplicaciones, etc.. 

En este Post vamos a usar Visual Studio Code para poder mostrarles facilmente los archivos creados por el CLI.
En caso de que no estes familiarizado con Visual Studio Code, necesitas crear un folder de trabajo que es donde armaras tu aplicacion, y ese folder tienes que abrirlo desde VS Code como el folder principal, esto se hace asi:
- Abre  VS Code
- Ve a File > Open Folder


Luego, seleccionas tu folder y haz click en 'Open Folder'


Una vez abierto el folder, para mostrar la terminal de consola presiona 'ctrl + `'
Y esta se abrira en la parte inferior de la ventana de trabajo en VS Code:


Thursday, June 1, 2017

Expression Solver Bot on C# using Python engine (Bots 101)

This sample will serve as an introduction to Microsoft Bots and Dialogs, and also to show you that we can use python's capabilities from within C#.


Prerequisites

The first step is to get all the prerequisites to create a Bot project based on the Microsoft Bot Framework on Visual Studio.
You can also see those steps here:

https://docs.microsoft.com/en-us/bot-framework/dotnet/bot-builder-dotnet-quickstart

- Install Visual Studio 2017 for Windows (If you don't have it you can install the VS 2017 community version for free).

- Download the Bot Application template from here: 

http://aka.ms/bf-bc-vstemplate 

and install the template by saving the .zip file to your Visual Studio 2017 project templates directory.The Visual Studio 2017 project templates directory is typically located here:

%USERPROFILE%\Documents\Visual Studio 2017\Templates\ProjectTemplates\Visual C#\


BOT para resolver expresiones en C# usando el engine de Python (Bots 101)

Este ejemplo sirve como una introduccion a el uso de Microsoft Bots y su manejo de dialogos, y tambien para mostrar que podemos usar funcionalidades de Python desde C#.


Pre-requisitos

El primer paso es obtener todos los prerequisitos para crear un proyecto de tipo BOT usando el Microsoft Bot Framework en Visual Studio.
Estos pasos tambien se pueden ver en este link:

https://docs.microsoft.com/en-us/bot-framework/dotnet/bot-builder-dotnet-quickstart

- Instala Visual Studio 2017 para Windows (Si no lo tienes puedes bajar e instalar la version community de VS 2017 gratis).

- Baja la plantilla de una aplicacion tipo Bot (Bot Application template) de aqui: 

http://aka.ms/bf-bc-vstemplate 

e instala la plantilla grabando el archivo .zip en el directorio de plantillas de  proyectos de Visual Studio 2017.Este folder esta generalmente ubicado aqui:

%USERPROFILE%\Documents\Visual Studio 2017\Templates\ProjectTemplates\Visual C#\